This easy tutorial will guide you through the process of setting up Microsoft Word 2003 for your MLA Format Essay. It is very easy and we are going to accomplish the following settings:
- All text is font “Times New Roman” & Size 12.
- One-inch page margin for all sides (top, bottom, right and left).
- A header with your last name and page number one-half inch from the top-right of each page.
- The entire research paper is double-spaced.
- Your name, name of professor, course title, and due date of paper on the first page.
- Your research paper title is centered.
- Body paragraphs have a 1/2 inch first line indent.
- A Works Cited page beginning on a separate page at the end of the paper.
I. How to Set the Font and Size:
Your entire paper must use font “Times New Roman” and size 12. To set the font to “Times New Roman”, click on the drop down arrow like in the image below => find “Times New Roman” => then click on it. Do the same for font size 12.

If you already typed something in your paper, you must select all text by pressing CTRL + A (that means holding down the CTRL key on your keyboard, keep holding it => then press the A key) => now select the font and size to apply to your already typed text.
II. How to Setup 1-inch Page Margins:
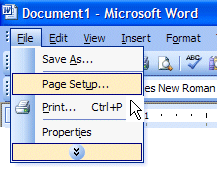
- Click on File on the very top left.
- Click on Page Setup.

- In the page setup dialog box, set each margin at 1″ inch by entering the number or using the up or down arrows beside each margin setting.
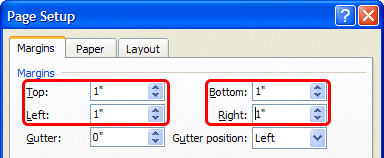

- Click OK to apply the changes.
III. How to setup the Header with your Last Name and Page Number:
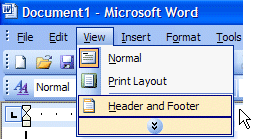
- Click on View on the top left => then click on Header and Footer.

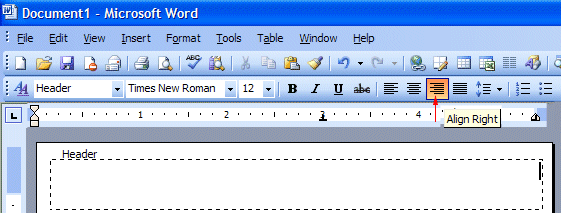
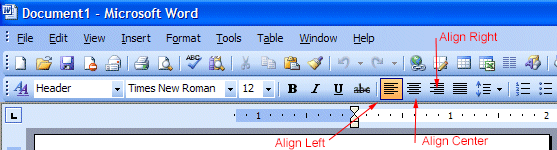
- The Header will appear at the top of your paper => Notice the cursor is blinking on the left of the screen => Click on the align right icon to move the cursor to the right.

- Type your Last Name => Then press the Spacebar once to leave a single blank space after your last name.
- Click on the pound sign (#) in the Header/Footer Toolbar to insert the page number, this will cause Microsoft Word to automatically increment the page number on your next essay pages.


- Click on the Close button to close the Header/Footer Toolbar.
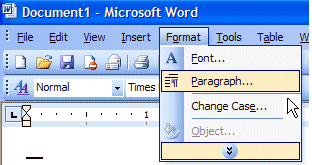
IV. How to Setup Line Spacing to Double Spaced:
- Click on Format => then click on Paragraph.

- On the “Indents and Spacing” tab, under “Line Spacing” => select Double.
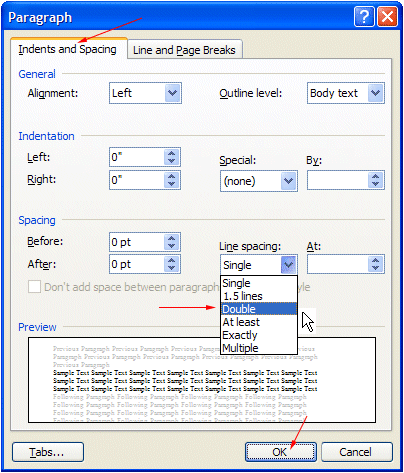

- Click OK to apply.
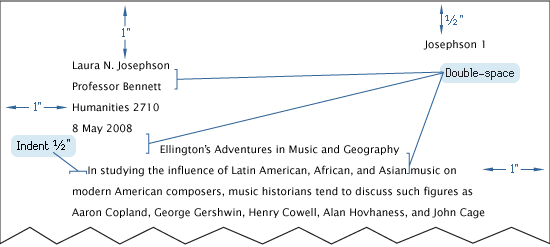
V. How to Setup your information on the First Page:
- Type your name => then press the Enter key on the keyboard once.
- Type your professor’s name => press Enter.
- Type the course identification => press Enter.
- Type the due date => press Enter.
- Click on the Align Center icon on the formatting toolbar (to center your blinking cursor) => Type the title of your paper, capitalizing the first letter and all major words and proper nouns. Do not use italics, boldfaced type, underlining, or all caps to format your title. Do not type a period at the end of the title => press Enter.
- Click on the Align Left icon (to bring your blinking cursor to the left).

- Click on the Tab key to indent 1/2 inch to begin your first paragraph. Use the Tab key on every next new paragraphs. Your completed setting should look like this:

VI. How to Setup the Works Cited Page:
Follow this how-to when you are ready to work on your Works Cited page. The Works Cited page has the following characteristics:
- A heading “Works Cited” centered one inch below the top edge of a new page. Do not bold or underline this heading.
- No indent on the first line of each entry. If an entry runs more than one line, indent the subsequent line or lines 1/2 inch from the left margin.
- Alphabetize entries in your list of works cited by the author’s last name, using the letter-by-letter system.
Immediately after typing the final line of your paper, press the CTRL key and the ENTER key at the same time to begin a new page (another method is to insert a page break from the toolbar). Your header with your last name and automatic page numbering should appear at the top right of your paper.
- Click on the align center icon so that the text is centered.
- Type Works Cited (do not underline, boldface, italicize, or enclose the title in quotation marks).
- Press the Enter key once to begin a new line.
- Click on the align left icon so that the text is aligned left.
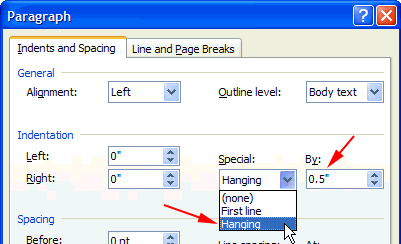
- The feature to setup indentation on the subsequent line/lines is called Hanging Indent. To setup hanging indent, click on Format => click on Paragraphs => under Special, choose Hanging => enter the value By 0.5 (or 1/2 inch) => click OK to apply the settings.

- Now type your sources. If you have Internet sources, when you type in the URL, Microsoft Word automatically apply the hyperlink to it. You should remove the hyperlink by right-clicking on the URL => choose Remove Hyperlink.
Sample:

I hope you found this tutorial easy to use. Take care!